Buy an NFT in 10 minutes
This is part of Velvet Basics, our newsletter on how to join the world of Web3. Today's topic: Purchase an NFT using Coinbase, MetaMask, and Foundation in 10 minutes.
In previous articles, we bought digital currency and set up a wallet. Today, we’ll buy an NFT on Foundation. Note that there are many other NFT marketplaces you can use to find and purchase on NFT - like OpenSea, Rarible, and SuperRare.
Non-Fungible Tokens, or NFTs, are assets with a unique digital identity that can be traded on a public blockchain. Platforms like Foundation create a marketplace and interface to easily discover artists and collect NFTs. Each time the digital artwork is sold on a marketplace, the original creators get royalties executed by the smart contract.
We believe there will be many more applications for NFTs in the future. For now, it’s a transparent way for artists and creators to monetize their content. Plus, it’s a fun way for you to experiment with transactions on the blockchain using a wallet and cryptocurrency.
What you’ll learn: How to find an NFT on Foundation, fund your wallet, and buy an NFT.
Commitment: Once you identify an NFT you want to buy, this should take about 10 minutes. The cost will depend on the price of the NFT and gas fees at the time of your purchase. We will show you how to do this all on your phone, but you might find it easier with a computer + your phone.
Want to launch your own NFT collection? Read our article here.
Create your account
First, you’ll need to connect a wallet to Foundation to create an account.
Haven’t created a wallet yet? Read our past articles on buying digital currency and setting up a wallet.
Go to the Foundation home page in your browser.
Open the navigation in the top right corner and tap the “Connect” button.
Choose WalletConnect, then MetaMask.
Foundation will ask you to sign the message in your MetaMask wallet.
Open the MetaMask app on your phone. You should see a modal appear asking you for permission to connect with Foundation. Press “Connect”.
Navigate back to your browser where Foundation is open. Tap “Continue”.
Now you should be signed in. You can change which wallet you’re connected with by disconnecting and re-authenticating with WalletConnect.
If you want a more detailed WalletConnect walk-through using a computer and a phone, follow along in our minting an NFT collection article.
Find an NFT to buy
Next up, find which NFT you want to buy.
This might be the hardest part. Find an artist you like at a price you’re willing to pay.
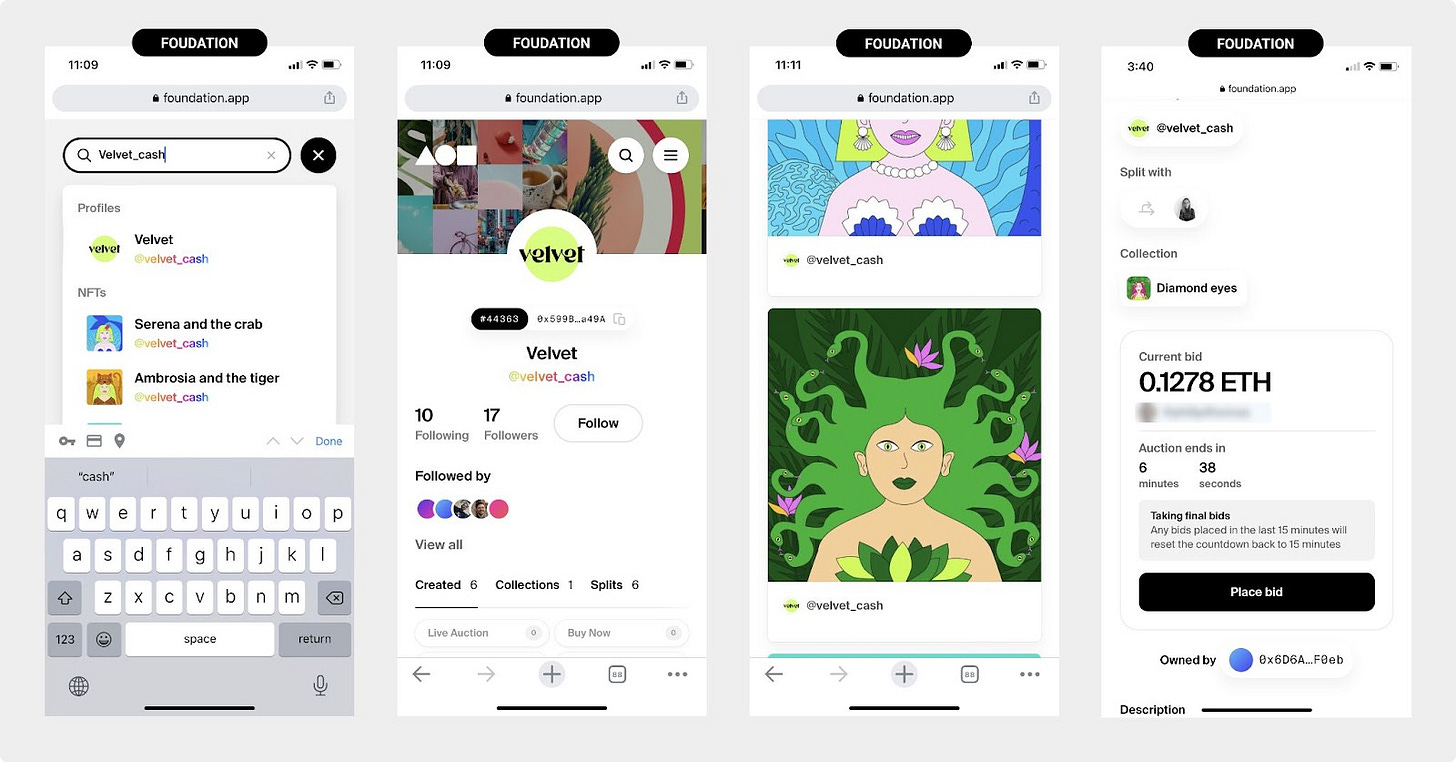
You can search by creator (like velvet_cash for example 😜)
Browse by the feed, trending artists, or search keywords. Follow artists you like and get notified when they’re dropping new collections.
Once you find something you like - Tap on the NFT to see who owns it, the transaction history, and the minimum bidding price.
Transfer money to your wallet
Next, it’s time to fund your wallet.
If you don’t have enough ETH in your MetaMask wallet to cover the purchase, the transaction won’t go through. You’ll need to fund your wallet with enough ETH to cover the purchase once your bid is accepted.
Open Coinbase and purchase ETH. Follow our buy digital currency article if you need more help.
Tap “Send” on the Coinbase home screen.
Copy your public address from your MetaMask wallet. Paste the public address in the Coinbase recipient field.
You should see the funds show up in your MetaMask wallet in under 30 seconds.
Make an offer
The fun part is here. Now you can place a bid on the NFT you want to buy.
Tap on the NFT you want to buy.
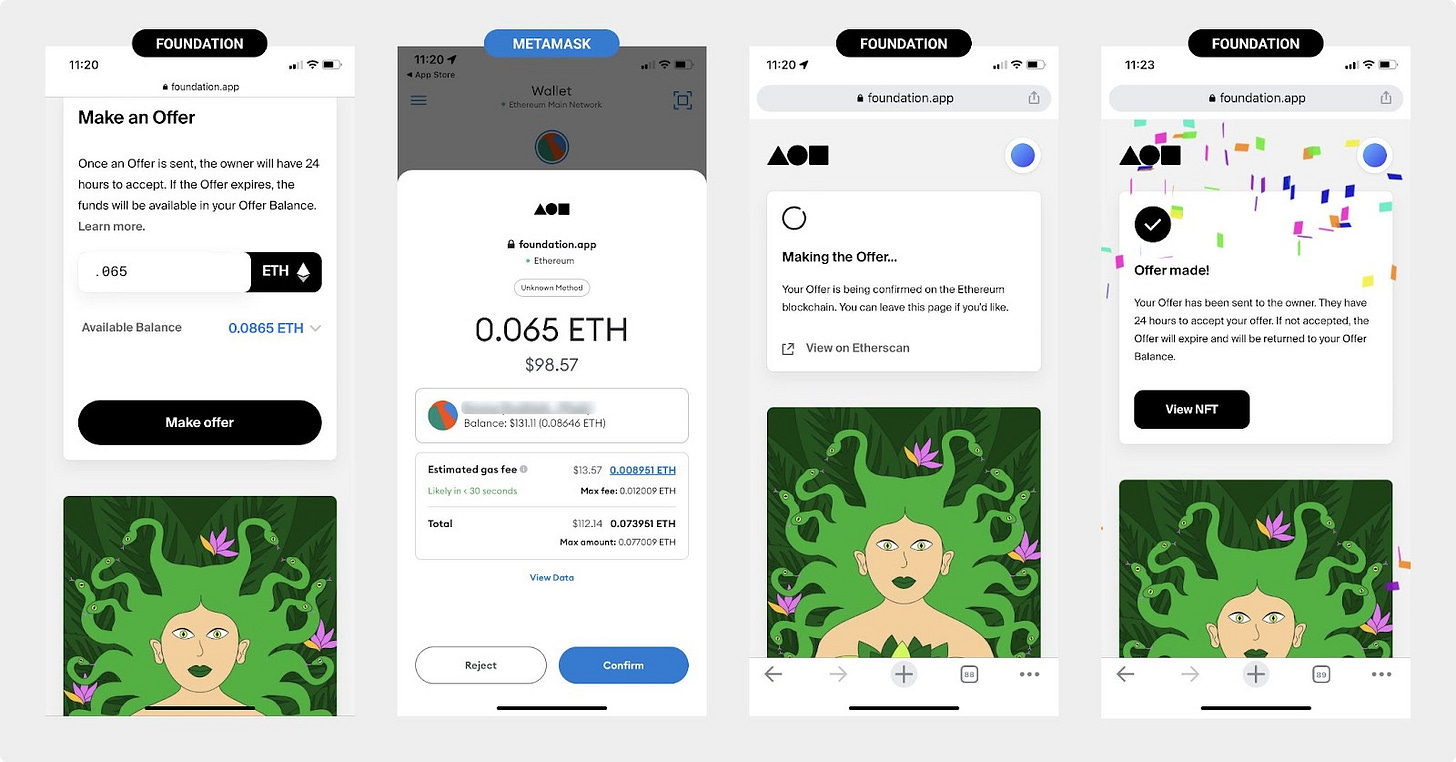
Enter how much you’re willing to bid. You can check the conversion rate of ETH to USD using a conversion calculator like this one from Coinbase.
Foundation will ask you to confirm the purchase in your wallet.
Open your MetaMask wallet and tap “Confirm”. Check the gas price to make sure you’re okay with the fee. If it’s too high, you can reject the transaction and come back later.
Go back to your browser where Foundation is open and wait until the transaction is complete. Once it goes through, you’re done for now.
Unless there was an instant buy price on the NFT, you’re now bidding in an auction. You’ll get an email notification if the creator accepts your offer. Make sure you have email notifications turned on in your Foundation account if you want status updates.
See NFTs in your wallet
Congrats, you’re now a proud NFT owner!
Once the creator accepts your bid price, you are the owner. You should get an email once they accept your offer.
Open your MetaMask wallet and navigate to the NFTs tab.
If you don’t see your NFT there, you may need to change security settings.
Navigate to “Security and Privacy” in MetaMask and turn on the toggles under “Enable OpenSea API” and “Autodetect NFTs”.
Go back to your NFTs tab and you should see your new NFT.
Great job, you’ve purchased your first NFT. Now you can transfer it to other wallets, list it on the secondary market, or just store it. We recommend you use a separate wallet for storing your assets. If you have really high-value assets, you should consider a more secure cold storage wallet like a ledger.
Now that you’re basically an expert, try minting your own collection!
Read more in our basics series:
💰 Money | Buy digital currency
🎨 Sell | Mint an NFT collection
See ya for the next one 👋 Team Velvet
—
Other topics or ideas? Respond to this email and we’ll add it to the list.
Want more from Velvet? Follow us on Twitter.
Obligatory note: We are not financial advisors or lawyers, and are not affiliated with any of these companies or recommendations. All thoughts are our own.


